
Skip to content
All tools
The Reddy app icon — a white R mark on a dark tile.

Reddy

AI IDE for game development

Make games with Reddy

Write code, build, and ask your editor to get things done. Reddy brings the work of making games into one IDE.

Windows 10/11 (64-bit)

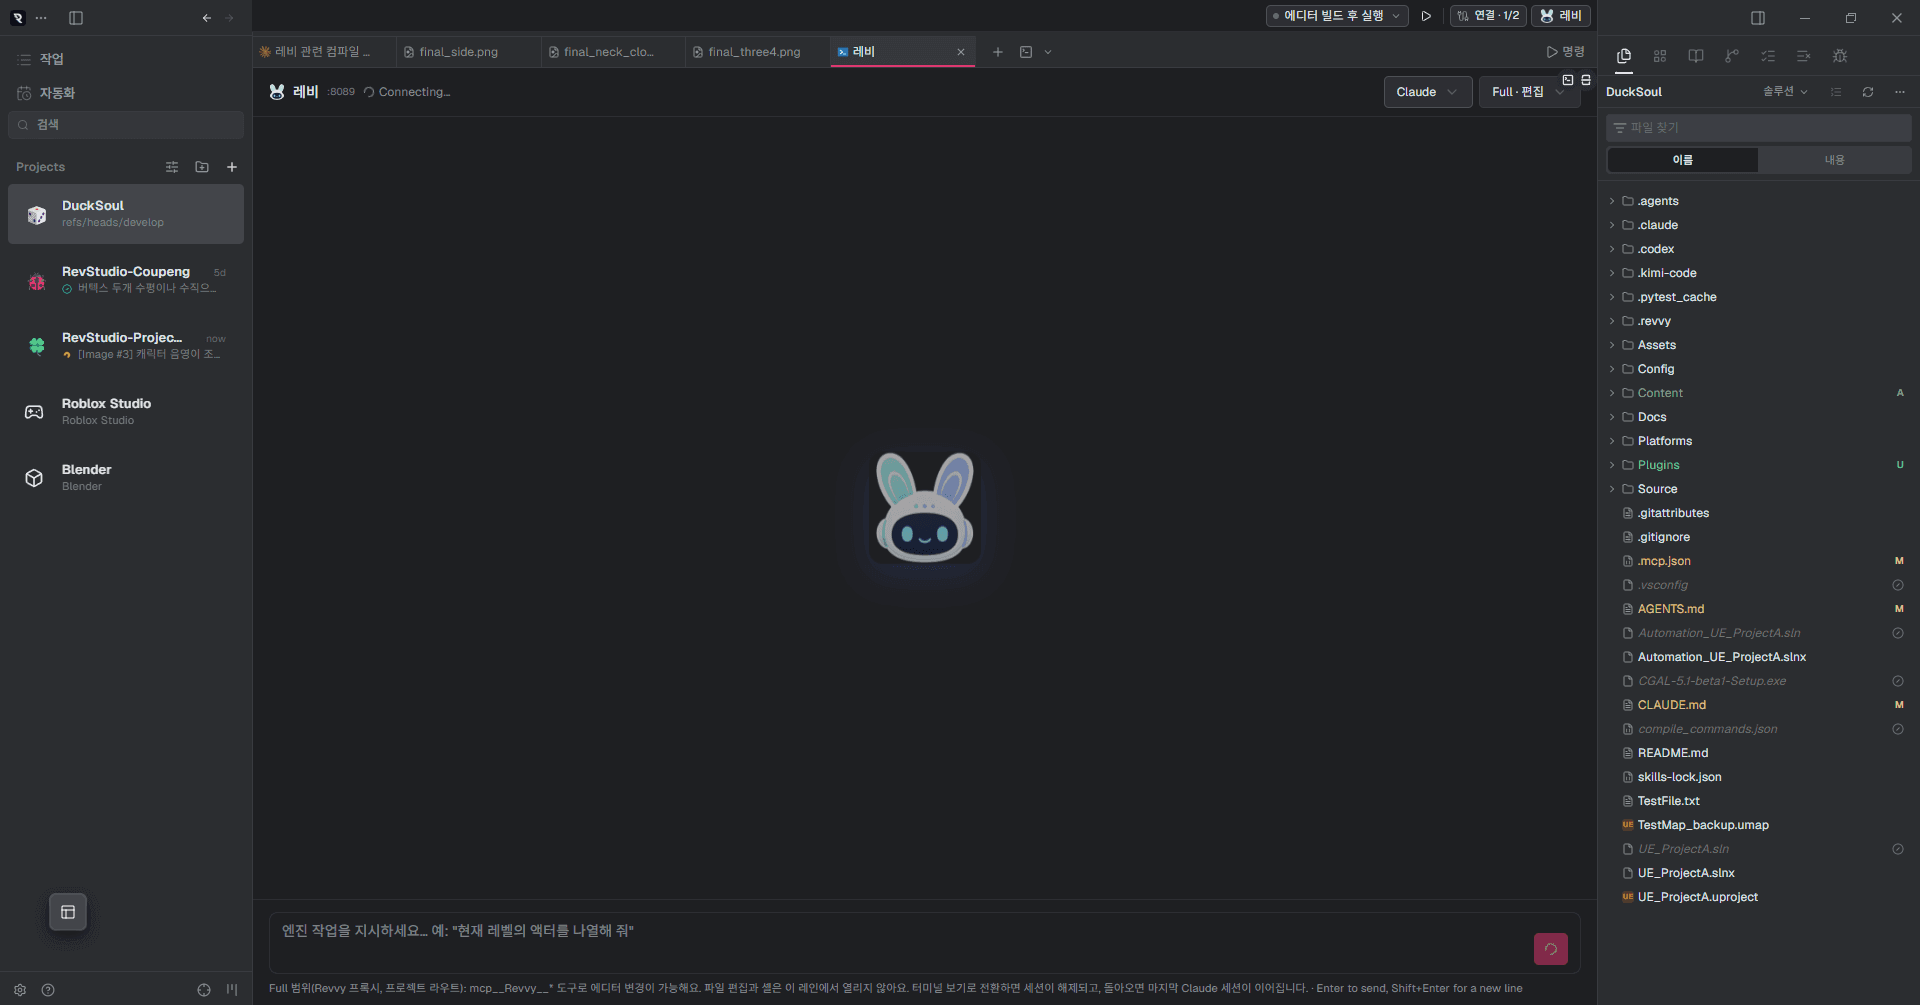
The Reddy window: projects on the left, the Revvy tab in the middle, an Unreal solution explorer on the right, and Build and run editor along the top.
Working on DuckSoul in Reddy.

01 / PROJECT

Open your project and get started

Add your game project folder. Reddy identifies the engine and prepares the editor connection, with code and assets together in one workspace.

Project setup details
  • Connect the right engine

    Project files identify Unreal, Unity, Godot, or Roblox.

  • Prepare the editor connection

    Reddy installs the bridge for the first connection and guides you through updates or plugin activation.

  • Connect your AI tools

    Connections are configured so your AI can inspect or edit the game editor.

  • Check your changes

    Updates check for files you edited. If changes are found, Reddy identifies them and stops the installation.

Keep project decisions and conventions in a shared note for later conversations to reference.
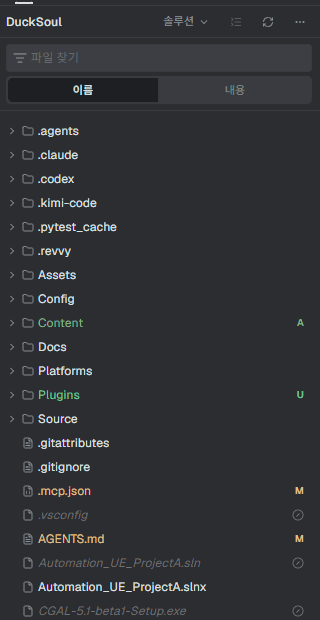
The solution explorer showing the DuckSoul project's Content, Source and Plugins alongside .mcp.json and AGENTS.md, with git status marks on the right.
The project explorer brings your code and assets together.

02 / BUILD & DEBUG

Make a change, then build

Choose a run configuration to build or debug your project. Select an error to jump to the code that needs attention.

The run bar: a Build and run editor dropdown, a run button, and a connection indicator.
Choose a configuration and press run.

03 / REVVY

Ask your editor to get things done

The Revvy mascot — a white robot rabbit with mint and lavender ears.

“Show me the actors in this level.” Use the Revvy tab to inspect the running editor or make changes.

The Revvy tab toolbar: Revvy and port :8089 on the left, Claude and Full · edit on the right.
Your current AI and editing permissions are shown in the toolbar.
  • Connect Claude or Codex
  • Safe to inspect, Full to edit
  • Choose models from your installed CLI
  • Continue a conversation or start a new one

Changing AI or permissions starts a new conversation. In Claude, use /resume to return to an earlier one.

Engines and tools

Unreal Engine 5.8

Blueprints, assets, materials, animation, playtests, builds, and debugging

Revvy editor plugin

Godot 4.5+

Scene and property editing, playtests, viewport captures, import, and debugging

GDScript bridge

Unity 6000.3+

Scene and prefab editing, playtests, viewport captures, solution builds, and debugging

Editor package

Blender 4.5 LTS / 5.x

Mesh, UV, and animation inspection; mesh and material editing; import and export

Blender bridge

Roblox Studio

Game-tree navigation, script editing, playtests, and mesh and material generation

Built-in MCP server

Connect Blender and Roblox through a Tool workspace. Roblox does not include build run configurations.

A closer look

Code and projects, together

Keep your code editor, terminal, Git, and browser in one window, with navigation and code tools built around game projects.

  • A project view for games

    Temporary build folders are hidden so you can focus on code and assets.

  • Find your way through code

    Use completion, go to definition, find references, and rename. Unreal code indexing starts when you open a C++ file.

  • See related Blueprints

    With the editor open, UCLASS declarations show how many Blueprints inherit from the class.

  • Work on tasks side by side

    Use separate worktrees, run multiple AI tasks, and schedule automated work.

Build and debug by engine
EngineRun configurationWhat it does
UnrealBuild and run editorCompiles the editor target and opens it if the build succeeds.
Build editorCompiles the editor target with UnrealBuildTool. Does not open it.
Run editorOpens the editor without compiling, from the last build.
Debug editorRuns the compiled editor under the debugger.
Automation testsRuns the project's automation tests headless.
UnityOpen editorOpens this project in the Unity editor.
Compile solutionBuilds the C# solution Unity generated.
Attach to editorAttaches the debugger to a running Unity editor.
Edit Mode testsRuns the Unity Test Framework in batch mode.
GodotOpen editorOpens this project in the Godot editor.
Import projectA headless import pass. Surfaces parse errors in every script.
Debug current sceneAttaches to the Godot editor's debug adapter.
GUT testsRuns GUT headless.
  • Build targets are read from your project’s settings.

  • Compiler errors and Korean Windows console output are supported.

  • Engine-specific debuggers let you inspect execution with breakpoints.

Skills for game development

Built-in skills cover tasks such as Blueprints, materials, and animation. Your AI refers to the skills relevant to the work at hand.

  • Included with the app

    Skills are installed into the AI tools you use, without a separate download.

  • Keep your edits

    Skills you modified are preserved during updates.

  • Read what’s needed

    The AI selects skills relevant to your current request.

Some of the work they cover

  • Blueprints
  • Niagara
  • Landscape
  • Materials
  • MetaSounds
  • UMG widgets
  • Gameplay Abilities
  • Character Movement
  • World Partition
  • Level Sequencer
  • Replication
  • PIE testing

Skills cover Unreal, Unity, Godot, Roblox, and common development tasks.

Choose what AI can do

Choose inspection or editor changes. Your current permissions are visible in the conversation toolbar.

New projects start in Full
Change the default in Settings to open future projects in Safe.
Safe inspects, Full edits
Safe reads the editor, logs, and screenshots. This connection does not provide file editing or shell access.
Revoke access to close the connection
Removing permissions in Settings closes the active connection.
Editor connections stay on this PC
Bridges and MCP servers connect locally. Requests to AI models go through your chosen CLI.
Know when a task is blocked
A request without the necessary permission is stopped with an explanation.

REDDY / WINDOWS

Getting started

Download for Windows

Windows 10/11 (64-bit)

  1. Download Reddy

    Download and install the Windows app.

  2. Sign in to your AI tool

    Install Claude Code or Codex and sign in.

  3. Add your project

    Choose the project folder for your game engine.

  4. Try a build

    For Unreal, select Build and run editor in the run bar.

  5. Start in the Revvy tab

    Try a simple request, such as “Show me the actors in this level.”

Add Blender and Roblox from + → Tool workspaces in the project list.

Installing on Windows

The current installer is not code-signed, so Windows SmartScreen may show an “unknown publisher” warning. Check the source of the file. To continue installing, choose [More info] → [Run anyway].

We’ll update this guidance when a signed installer is available.

Code signing certificate · Not yet signed

FAQ

Which AI can I use?

Connect an installed and signed-in copy of Claude Code or Codex. You don’t need to enter a separate API key in Reddy.

How is project data handled?

Reddy connects to the editor on your PC. Data included in AI requests is handled according to your CLI and AI service settings and policies.

Does the editor need to be open?

It needs to be open for inspection and editing. Code navigation and builds also work with the editor closed.

What can I build?

Builds currently support editor targets on Windows. Game cooking, packaging, and Roblox run configurations are not included.

Which engine versions are supported?

Unreal targets 5.8 and Unity targets 6000.3. Godot uses the 4.5 API and has been checked on 4.6.1.

How does AI billing work?

Usage follows the account and plan of the AI service you connect. Check that service’s terms for details.

Credits

  • Orca ↗MIT · the open-source IDE Reddy is built on
  • VibeUE ↗Kevin Buckley · MIT · the base of the Revvy Unreal plugin